Friday, June 13, 2014

 Everything's Coming up Roses!

Well, thats how this ceiling tile-turned magnet board makes me feel, anyway. With the new Spiral Flower Originals Die from Stampin' Up! anyone can make these gorgeous roses in no time!


I used Real Red and Crumb Cake DSP and adhered them together with a glue dot. A strong magnet on the back ensures I can hang up favorite cards and tags made of heavy cardstock. The flower centers are Jumbo Pearls left over, and for the Scallop Punch flower-I used the Baked Brown Sugar from the In Color Boutique Details. I like how the embossing mimics the look of the ceiling tile. Flower "leaves" are punched from Gold foil sheets and DSP using the new banner Punch.

The tag is stamped in Basic Black Ink on Whisper White Cardstock, and one detail added with Baked Brownsugar Marker. I love how it looks like a Chalkboard! What is fun about this image is that if you don't ink it perfectly it looks even more realistic as a sort of "erased" chalk board.


The image is stamped from the Chalk Talk set, from the Stampin' Up! Catalog. We received this stamp set last summer at Convention and I have found a ton of ways to use it. This stamp is my favorite, as it has a coordinating die cut and looks great (like a bread tag) wrapped around a cellophane bag for gifting.


When you find fun items like this tile, and want to give them as a gift, don't forget to add a quick and lovely "upgrade" using just basic card stock, stamps and ink. My Mother is actually getting this, so I chose one of her favorite colors Real Red. I can't wait to see it on her wall with pictures of my kids (of course) and the hand stamped card I am making to go with it.

Have a great weekend!


Friday, November 22, 2013

"Sleigh Ride" Decorative Wood Sign

Hello Everyone! I have been busily preparing for Christmas parties and Thanksgiving, and thought of this fun idea for using my Stampin' Up! Build-A-Banner kit to make a trendy sign for my mantle decoration. These wood signs are all the rage on Pinterest right now, and I just knew I could create one with my stamping products and no paint! 

 I purchased a 6"x 30" piece of wood from the hardware store-only 1/2" thick, this helps keep the weight down while still having that vintage wood sign look. I started by wiping it down and placing painters tape across the top and bottom to give it a border. Then I took the Alphabet stencils and placed them down to see how they would fit for the words I wanted. I used washi tape to hold them down as I simply took a pencil and traced the letters.I then laid the stripes and chevron stencils over the entire sign and simply spritzed it with my Stampin' Spritzer from the kit. I used alcohol and Baked Brown Sugar and Crumb Cake ink refills. I also used my Vanilla Smooch Spritz to add some snowy shimmer to the entire sign. I then filled the letters with Tombo glue, 2 or 3 at a time and sprinkled our new Silver Stampin' Glitter over them. I let it sit just about 10 seconds or so and then tapped it off. I just love the contrast of the glittered letters on the bare wood! I couldn't believe how easy it was to get such a professional and clean image. It was all dry and finished within a half an hour of beginning the project! 


 I like how the ink spritz gives it that vintage aged look I love, while adding the glimmer of the glitter. I had planned on adding a snowflake or other embellishment to the end, but I love the simple beauty of it as it is. It was all made with the Build-A-BAnner kit,Ink, Tombo glue and Stampin' Glitter. Why buy pricey cookie-cutter signs at the department store to decorate for the Holidays, when you can make something much more personal and satisfying right in your craft room! If I can do it with 4 kids and all of the Holiday activites quickly approaching you can too! I can imagine many more projects with this fantastic kit! I also made some banners to use for Christmas and other events and will be posting those to my blog in the next week, just in time for Christmas. 

  I wish you good family, good friends, good turkey, and great stamping ideas! Gaylyn Pantana


Friday, June 28, 2013

Keep Calm and get back to Blogging

 So, it seems I left you all hanging some time ago when my littlest was injured. All is well now and, even though I have been stamping almost daily, I have kept myself too busy to blog about it. It's time for some catch up!   Today I am doing a special post for my fabulous upline Debbie Naylor over at UnfroggettableStamping.typepad.com for her Sisters In Stamping Fabulous Friday post.   The theme is red white and blue, and I did a little something different here by making a fun 3D ticket booklet. This is a great gift idea to have on hand for that unexpected event, or birthday gift. There is a ticket to Stamp On, Shop On, and Have a Cupcake. I offered the gift recipient a gift certificate of free product with the Shop On, a discounted class fee with the Stamp On, and a Cupcake ticket. Because sometimes we just need permission to have a cupcake! Go ahead! It's your Day!  All Products used at end of post. Thanks for visiting! So glad to be back to blogging all the fun things I've been creating.   


All products from Stampin' Up! Shop anytime online at Gaylyn@stampinup.net  
Carry On Stamp set  
Paper/Cardstock-Island Indigo, Riding Hood Red, Summer Starfruit, Whisper White, and Sycamore Street Designer Series Paper.   
 Tools-3/4" and 1" and 1 1/4" Circle Punches.   
 Embellishments- Riding Hood Red 3/8" Taffeta Ribbon, Rhinestone Basic Jewels. 

Friday, October 9, 2009

Night out on the Town?


Don't forget your "purse"! Fill this beauty with some chocolate, and any other necessary item and go anywhere!


Noone will believe it is just paper. One 12x12 actually. Yes, that is the new Designer Paper in Stampin' Up!'s Holiday Mini Catalog. Night and Day Specialty Paper. I love all of the detail on these pages-and of course the rockin' prints! Black and White-my favorite! There are 2 sheets of Clear CS with Black Polka Dots on them in this pack. Love! I will have to make something with those and share it.


This purse was made with just a few folds, no tape or glue. After filling it with some treats I closed it with some Jumbo Eyelets and used them for the ribbon handle. Cute, easy and fun to do while watching Heroes.


This is a quick post while kids are asleep. Enjoy making these!


Mwah! Darling.

Saturday, October 3, 2009

Happy World Card Making Day!!


I am having a contest today!

In honor of this event I am offering a fun challenge and prize! Make a hand made card of any shape and size today and post a picture of it on your blog, splitcoast, or SUColorQ and send the link to me! You may also reply to this post with a comment, but be sure to leave a link.

I will put each participants name in a hat and draw a winner-who will receive a craft kit from my prize box! Have fun! Your card does not have to be stamped, just hand made!
I look forward to seeing what you create!


I know this picture is dark, but my husband took it with his phone. This is my "iPhone" card I made for him. I love how it turned out.
You have until Midnight Sunday, October 4 EST to participate in this contest.

Thursday, March 5, 2009

GIRLY it is!


Kristina Werner's Color Challenge #44!!!

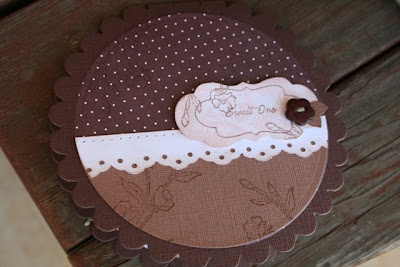
I saw this Girly combination, and thought it was so sweet! It reminded me of a candy store with lots of Chocolate! So, I took out my Big Shot and decided to go for a "cookie" shaped card this time. I got to play with all of my new goodies! I just love the Sizzlits tag dies, and the new eyelet "lace" punch. A yummy little Chocolate Chip button was just the right topping. Feast your eyes.....new stamp sets coming out in April-there on the tag!! I love being a demo, and I love this company and all the fun coordinating stuff they come out with. This card was as sweet and simple! THanks for looking!


Supplies are all Stampin' Up!
Paper: Textured Chocolate Chip and Close to Cocoa, Whisper White
DSP-Bella Rose
Die Cuts-Big Shot, Sizzlits lots of Tags
Punch-Boho Blossoms, Eyelet
Stamps-Friends 24-7, Matchbox Messages
Button-latte
Ink-Close to Cocoa


Tuesday, February 24, 2009

Watercolor Toile


Totally addicted to watercoloring with Reinkers. I started stamping some mini cards for a friend of mine who had purchased some stamps awhile back. I used the Bella Toile, and had some extra pieces to use up to make her a card. So.....I have been spending any free time I get with Stampin' Up!'s watercolor paper and Stazon making up pictures/cards to watercolor. Once you drip some precious drops of reinker in your inkpad lid, and juice up that Aquapainter-all that color lust(like wanderlust, except for color) just overcomes you and-you paint every piece of paper anywhere near your reach.


I caught up on all the LOST episodes I missed while in Cali visiting my sis-in-law/downline and painted all night for several nights. If you are a friend or customer of mine you will probably get something watercolored. If I know you or consider you an acquaintance, I may give you a handpainted picture. If I pass you in the street, I may just tell you how the sunset looks like it has been watercolored, and invite you over to stamp and watercolor with me. Watch out people-I have a new obsession! If I stare blankly at you while you are talking it is probably because I am thinking about watercoloring your sweater. If I stutter when you invite me to coffe(which is my first love that I'll never get over) it is because I am probably imagining if I could color you what colors you would be.......etc. By the way, I am most definitely a Cameo Coral melting into Tempting Turquoise with lots of white area, and some black defining the edges. Yes, I have painted myself. I will happily paint you if you are interested..Back to my post. I was making this card for my friend who is definitely a Black Toile if I have ever met one. Then I started to watercolor in some Riding Hood Red-which is exactly the color of her lipstick, and other things she really likes-like her phone and Pottery Barn $50.oo napkins or whatever. Yes, this is what I like about her. A little Kiwi Kiss for that perfect balance, some very regal River Rock, a Regal Rose here and there for good measure-and some Pink Pirouette just to show I made it-and voila! I love the way it turned out-it looks like her as a card. A little bling, very neat polished sides, a lovely tapestry.

I should do this more often. Very cathartic. I wonder what my DH would be. He's Italian, so- lots of black there also, Rough around the edges, very manly. No frou-frou at all. Metro he is not! Yet, he never gets his hands dirty-and he's incredibly snobbish(in a good way?), so smooth and solid images, like Organic Outlines. I would paint him in Kiwi Kiss, Blue Bayou, Going Gray, and almost no white. He is dark and lovely and I could draw his face from memory. It is my favorite face.

Anyhow, this watercolor/painting thing really brings the poet back out in me. I may just share some of that next post. Thank you for looking. I love your comments!! Come back anytime. Oh yeah, one of my new favorites also is Heat and Stick powder-which I used on the sentiment and then added the Black Glitter!!! It is so beautiful in person. Love that stuff.